
How to Transfer SSD/HDD Data Between a PC and Laptop Over the Same WiFi or Ethernet Network
A passionate SEO professional with 8+ years of experience helping businesses grow their online presence.
Transferring files between a PC and a laptop does not always require a USB drive, external hard disk, or cloud storage. If both devices are connected to the same WiFi or Ethernet network, you can move data from one SSD or HDD to another using Windows Network Sharing.
This method is useful for moving large videos, project folders, software backups, design files, documents, and other important data. It is also faster and more convenient when both devices are in the same home or office network.
In this guide, I will show you how to share a folder from one Windows device and access it from another device using a local network.
Step 1: Connect Both Devices to the Same Network
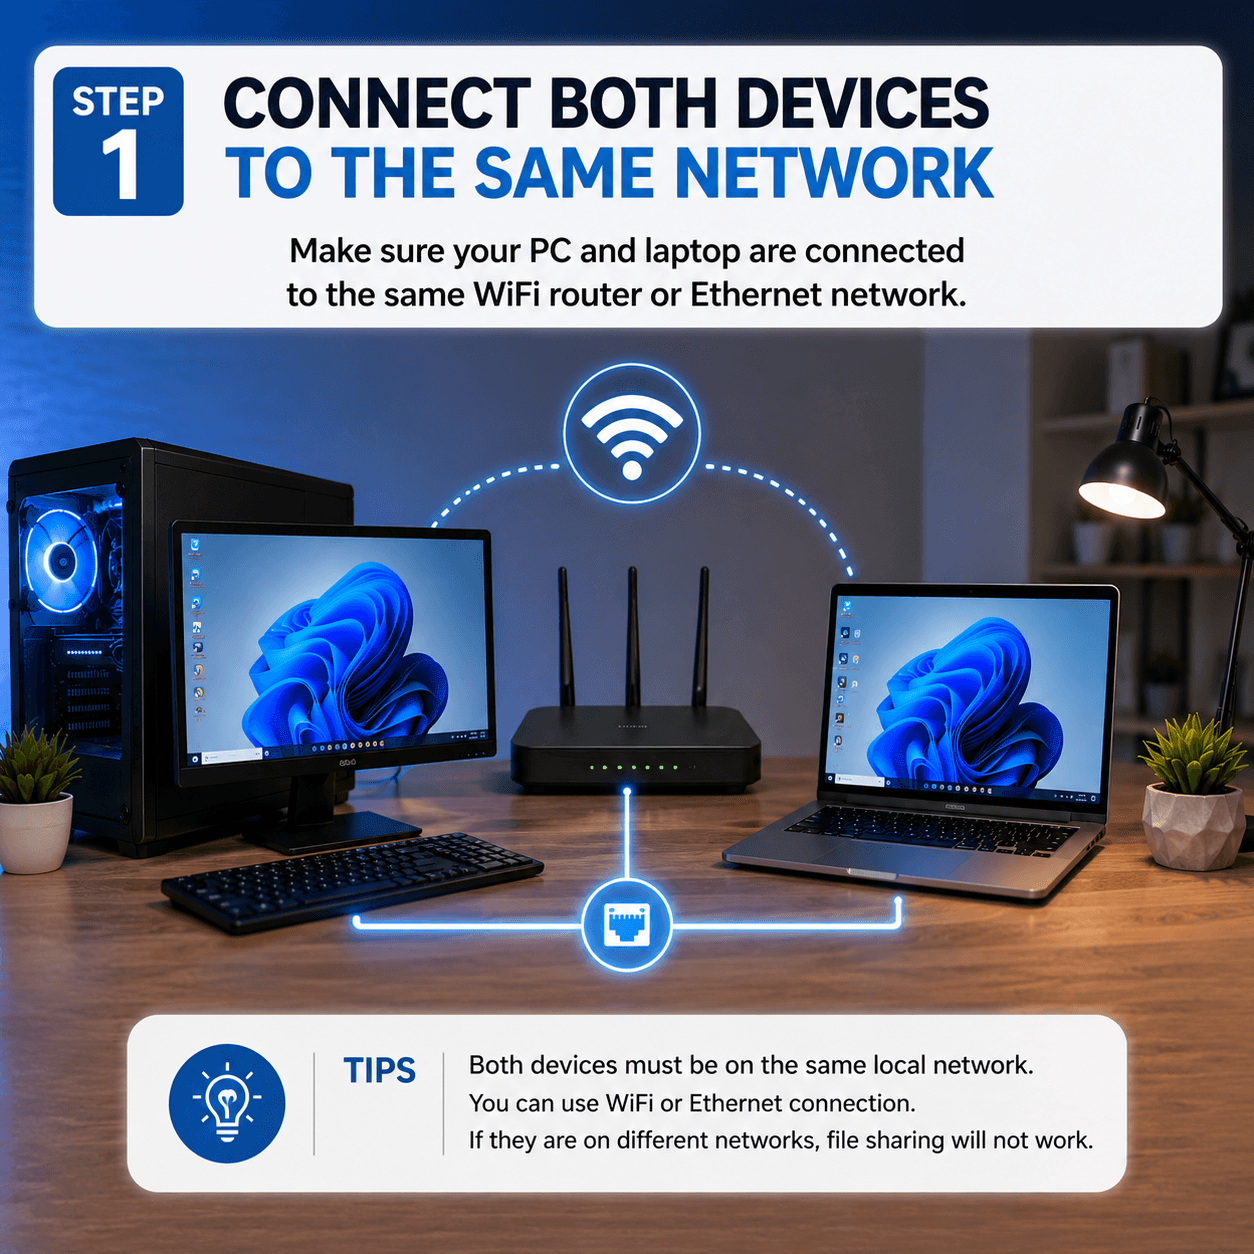
First, make sure your PC and laptop are connected to the same router. You can use:
- Same WiFi connection
- Same Ethernet network
- One device on WiFi and another on Ethernet, if both are connected to the same router
If the devices are on different networks, Windows file sharing may not work properly.
Step 2: Turn On Network Discovery
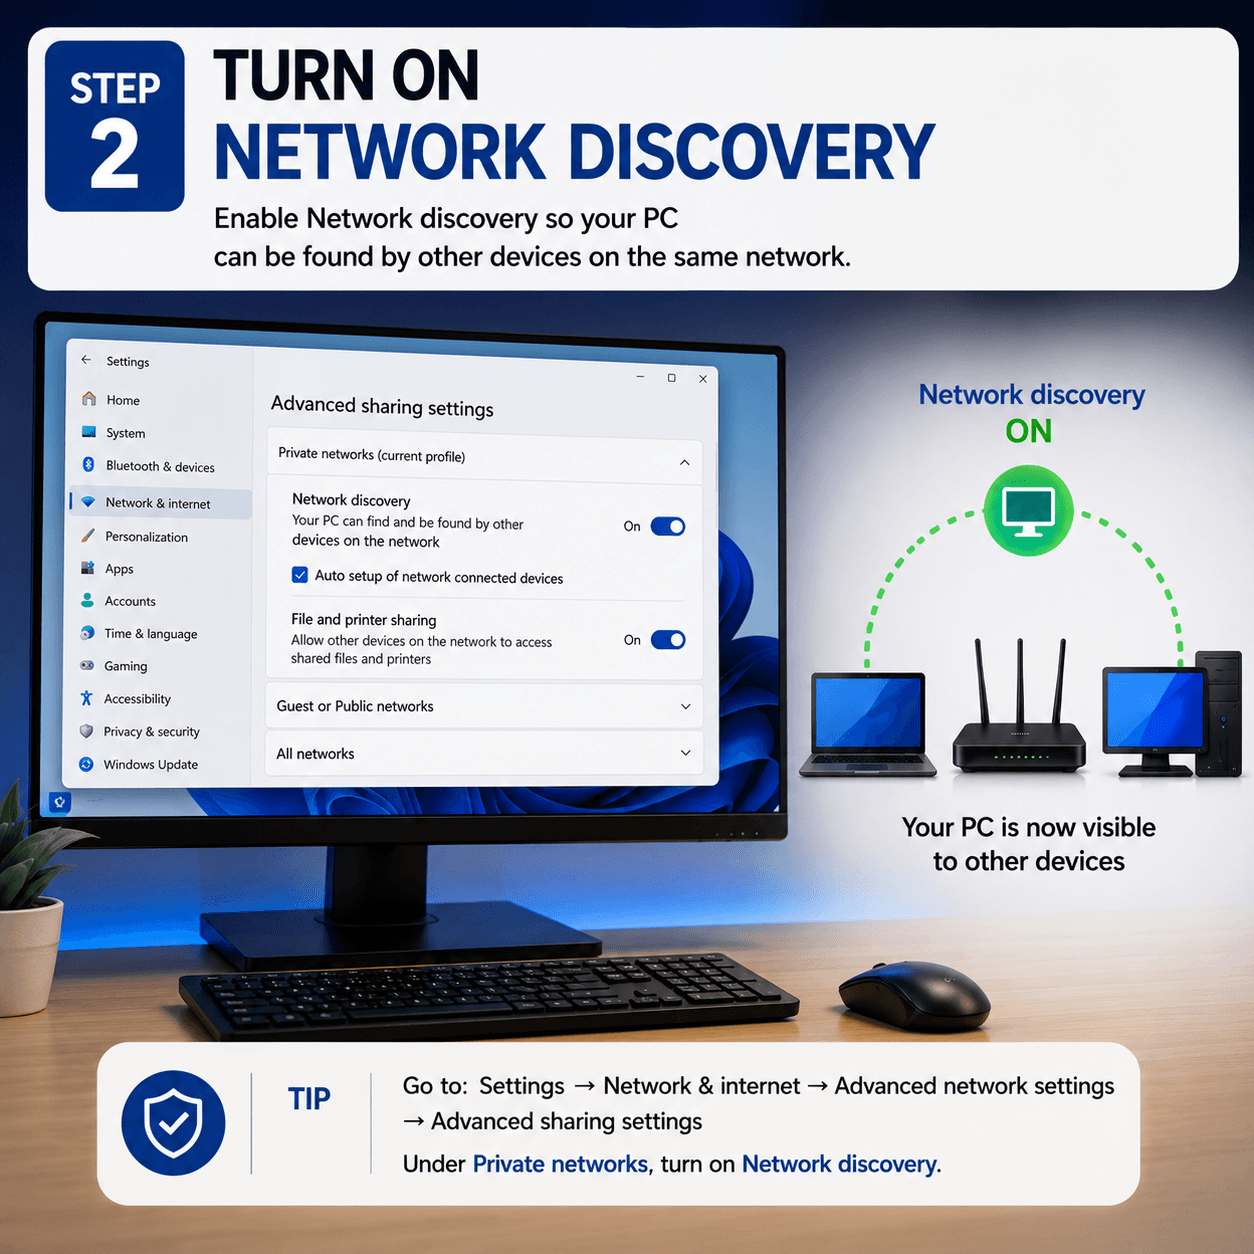
On both devices, open:
Settings → Network & internet → Advanced network settings → Advanced sharing settings
Under Private networks, turn on Network discovery.
This allows your PC or laptop to be found by other devices on the same network.
Step 3: Turn On File and Printer Sharing
In the same Advanced sharing settings page, turn on File and printer sharing.
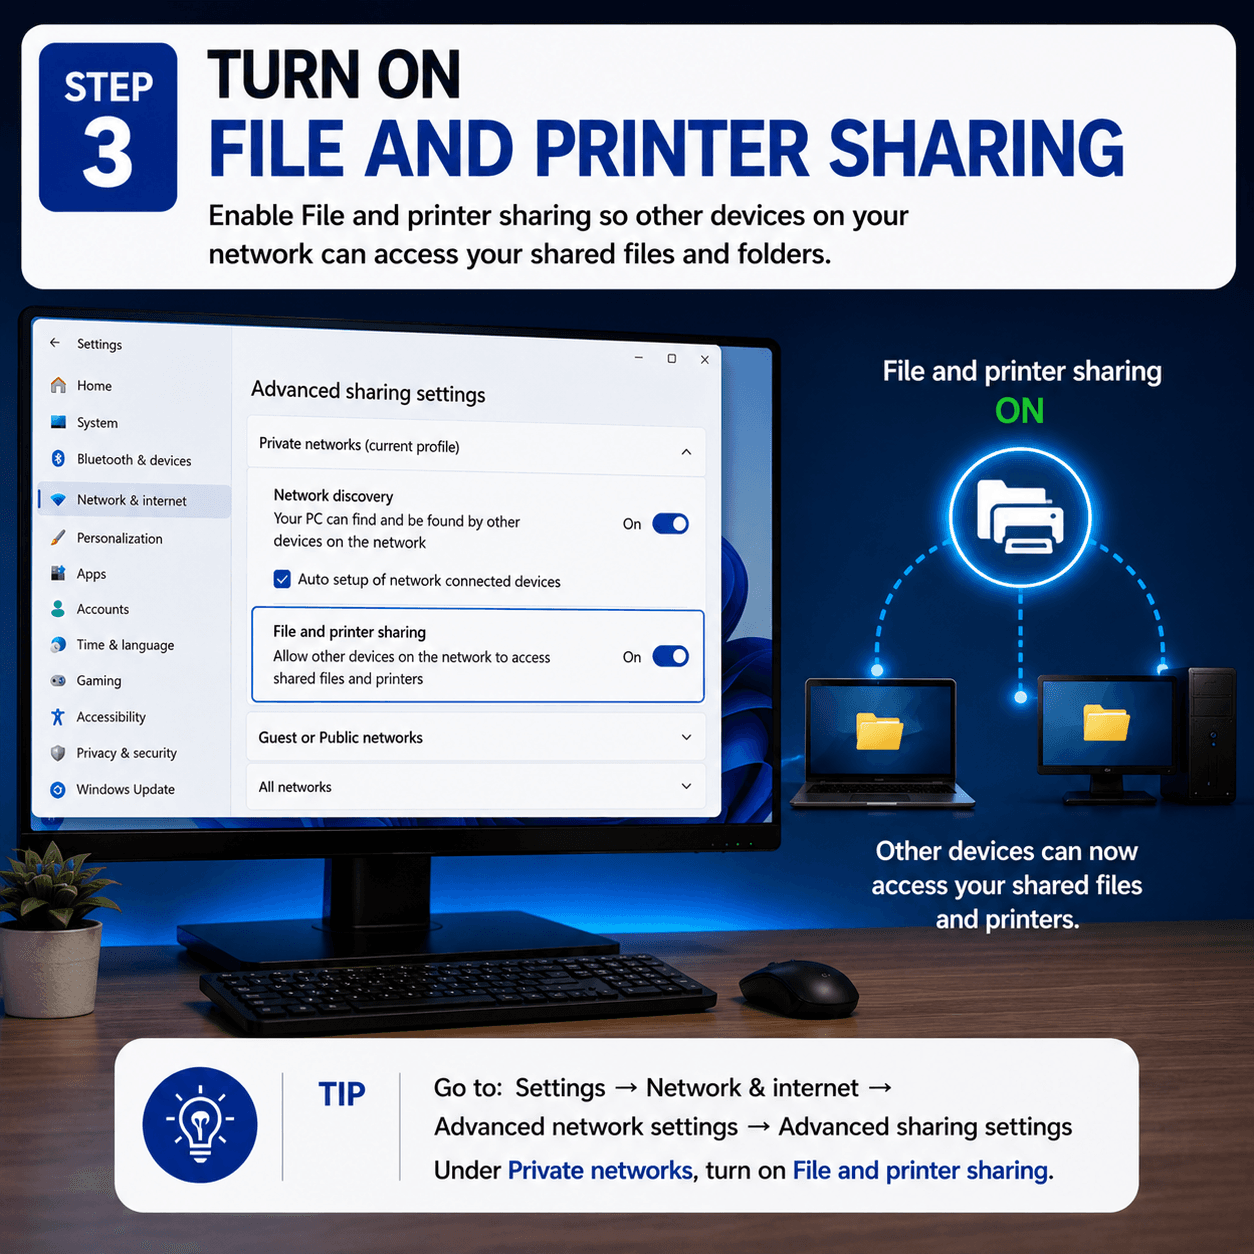
This option allows other devices on your network to access shared files and folders from your computer.
Step 4: Create a Folder for Sharing
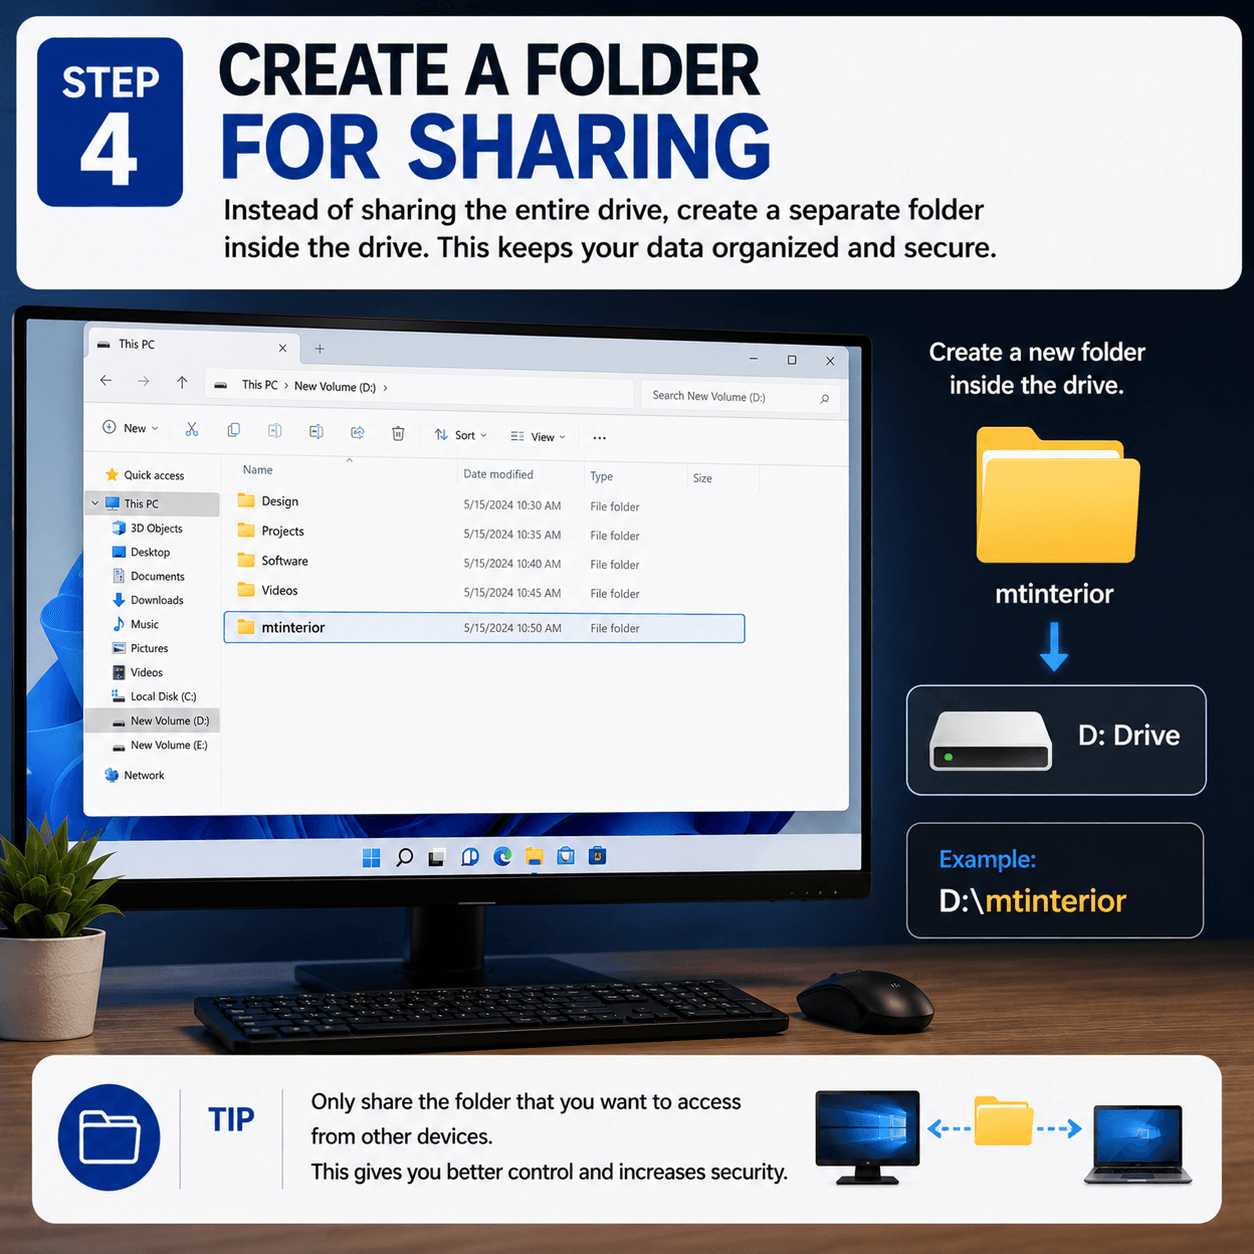
Instead of sharing your full SSD or HDD drive, it is better to create a separate folder inside the drive.
For example:
D:\mtinterior
This keeps your files organized and gives you better control over what other devices can access.
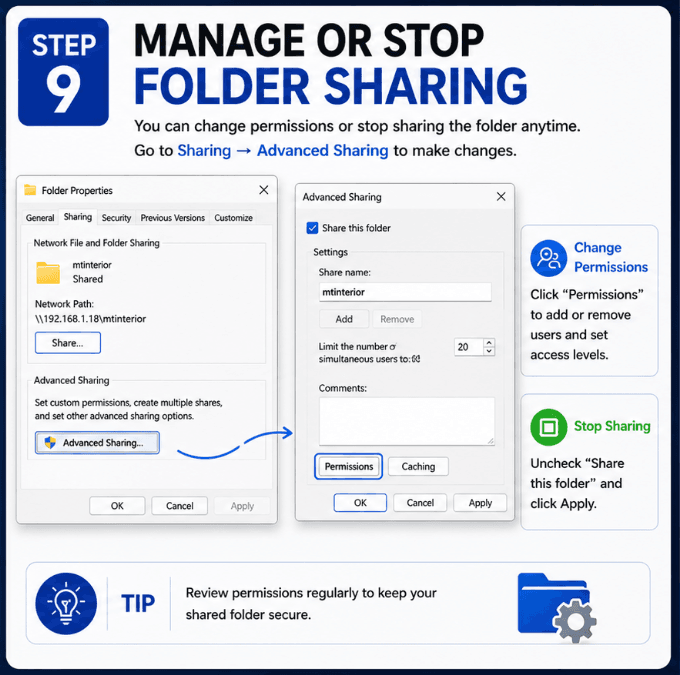
Step 5: Enable Folder Sharing
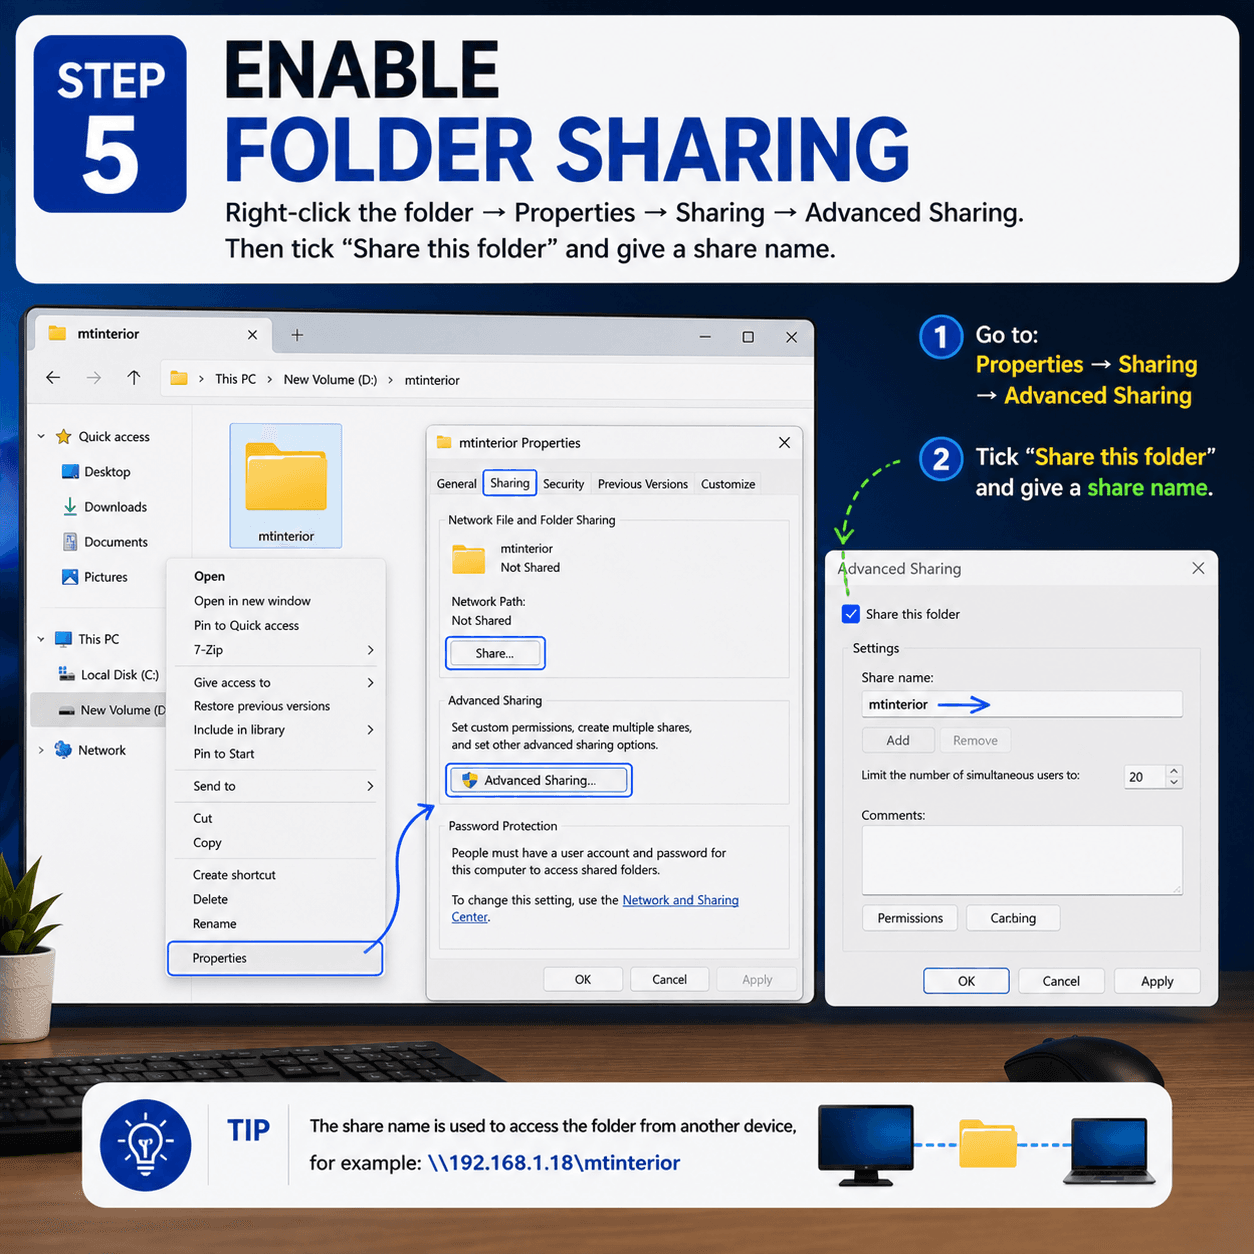
Right-click on the folder you want to share, then go to:
Properties → Sharing → Advanced Sharing
Now tick Share this folder and set a simple share name, such as:
mtinterior
This share name will be used when accessing the folder from another device.
Step 6: Set Sharing Permissions
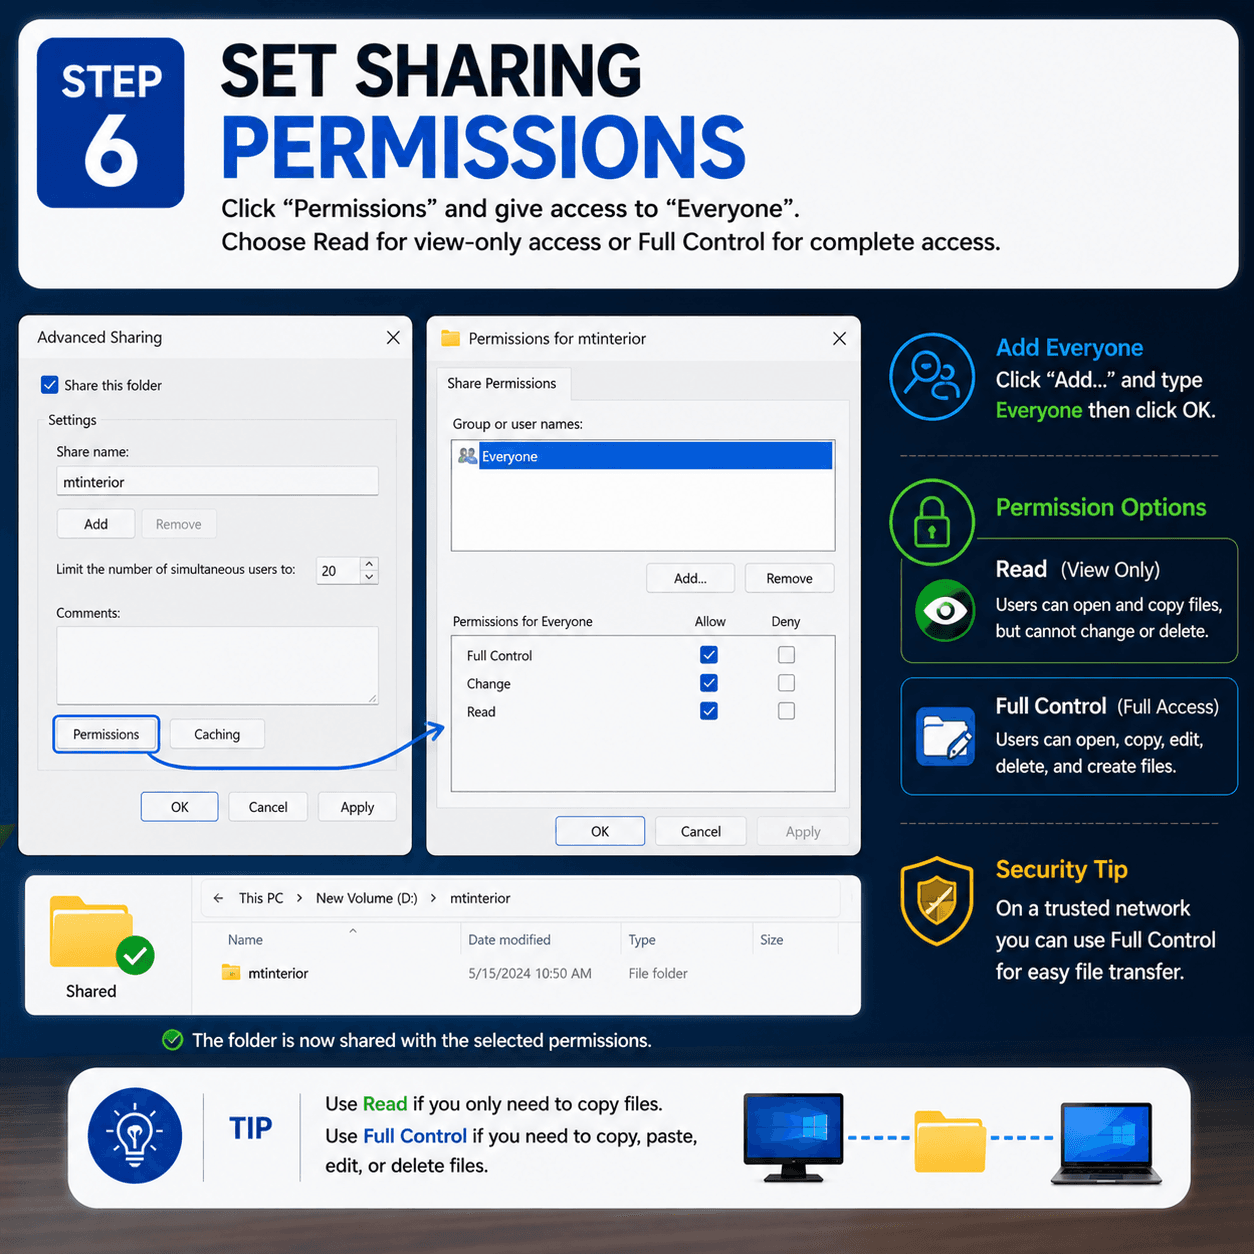
Click Permissions and select Everyone (add it if needed).
If you only want other devices to copy files from this folder, allow Read.
If you want full access, including copy, paste, edit, and delete, allow Full Control.
For personal devices on your own trusted network, Full Control can make file transfer easier. But if you are on a shared or public network, use limited permission for better safety.
Step 7: Find the IP Address of the Sharing Device
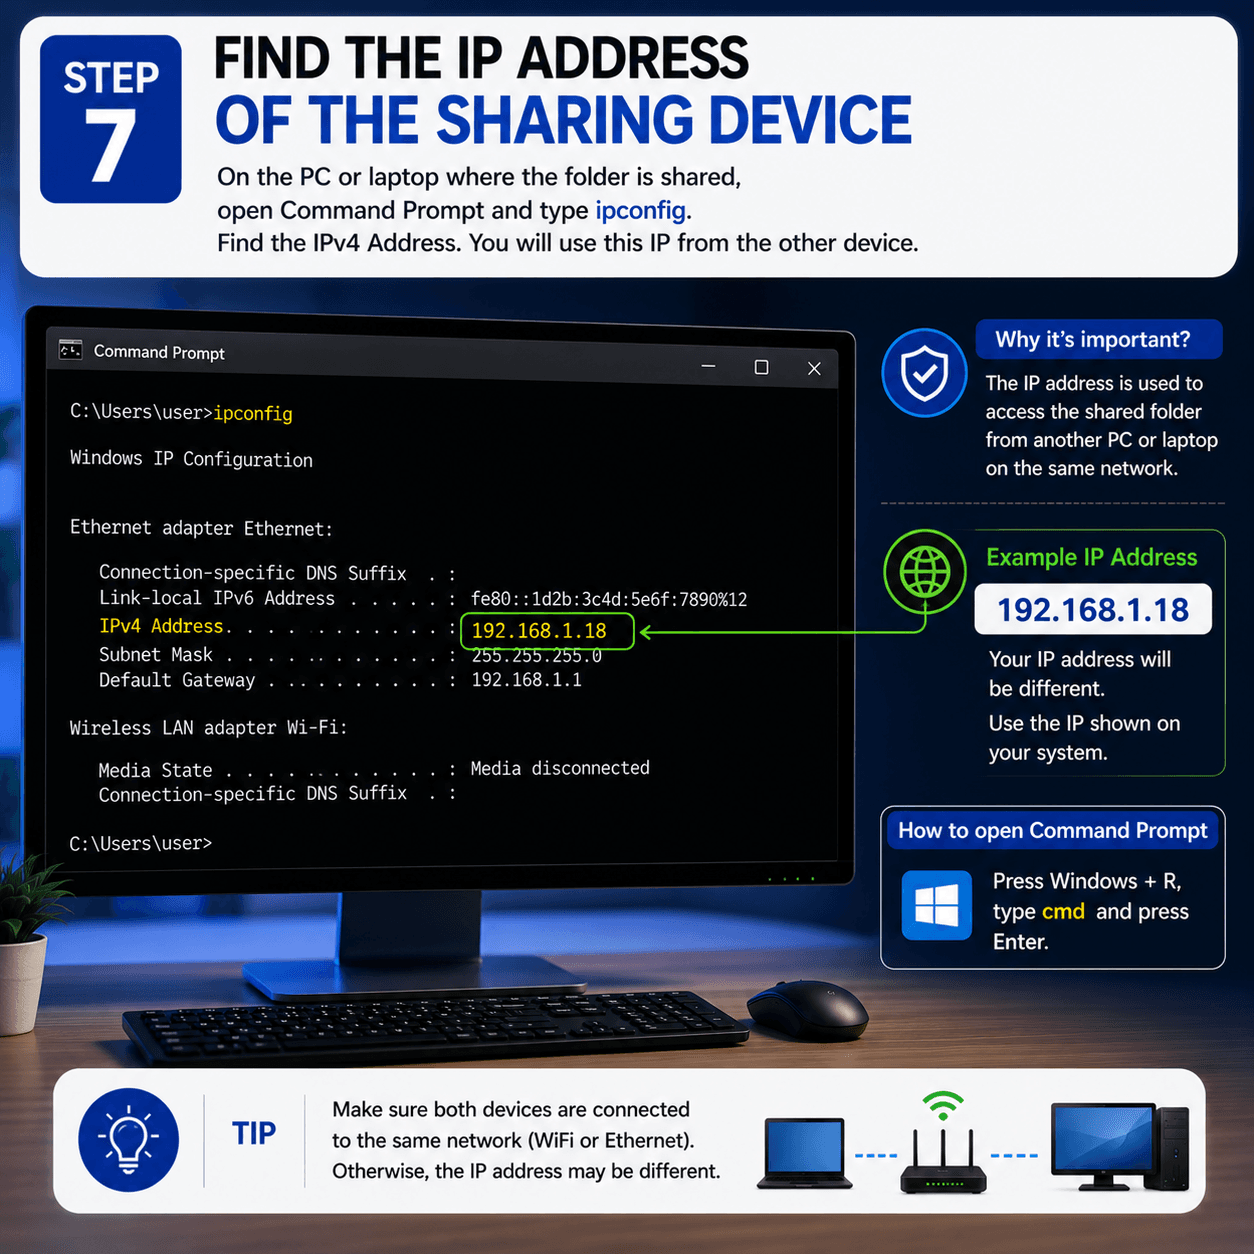
On the PC or laptop where the folder is shared, open Command Prompt or PowerShell and type:
ipconfig
Find the IPv4 Address. Example:
192.168.1.18
You will use this IP address from the other device.
Step 8: Access the Shared Folder from Another Device
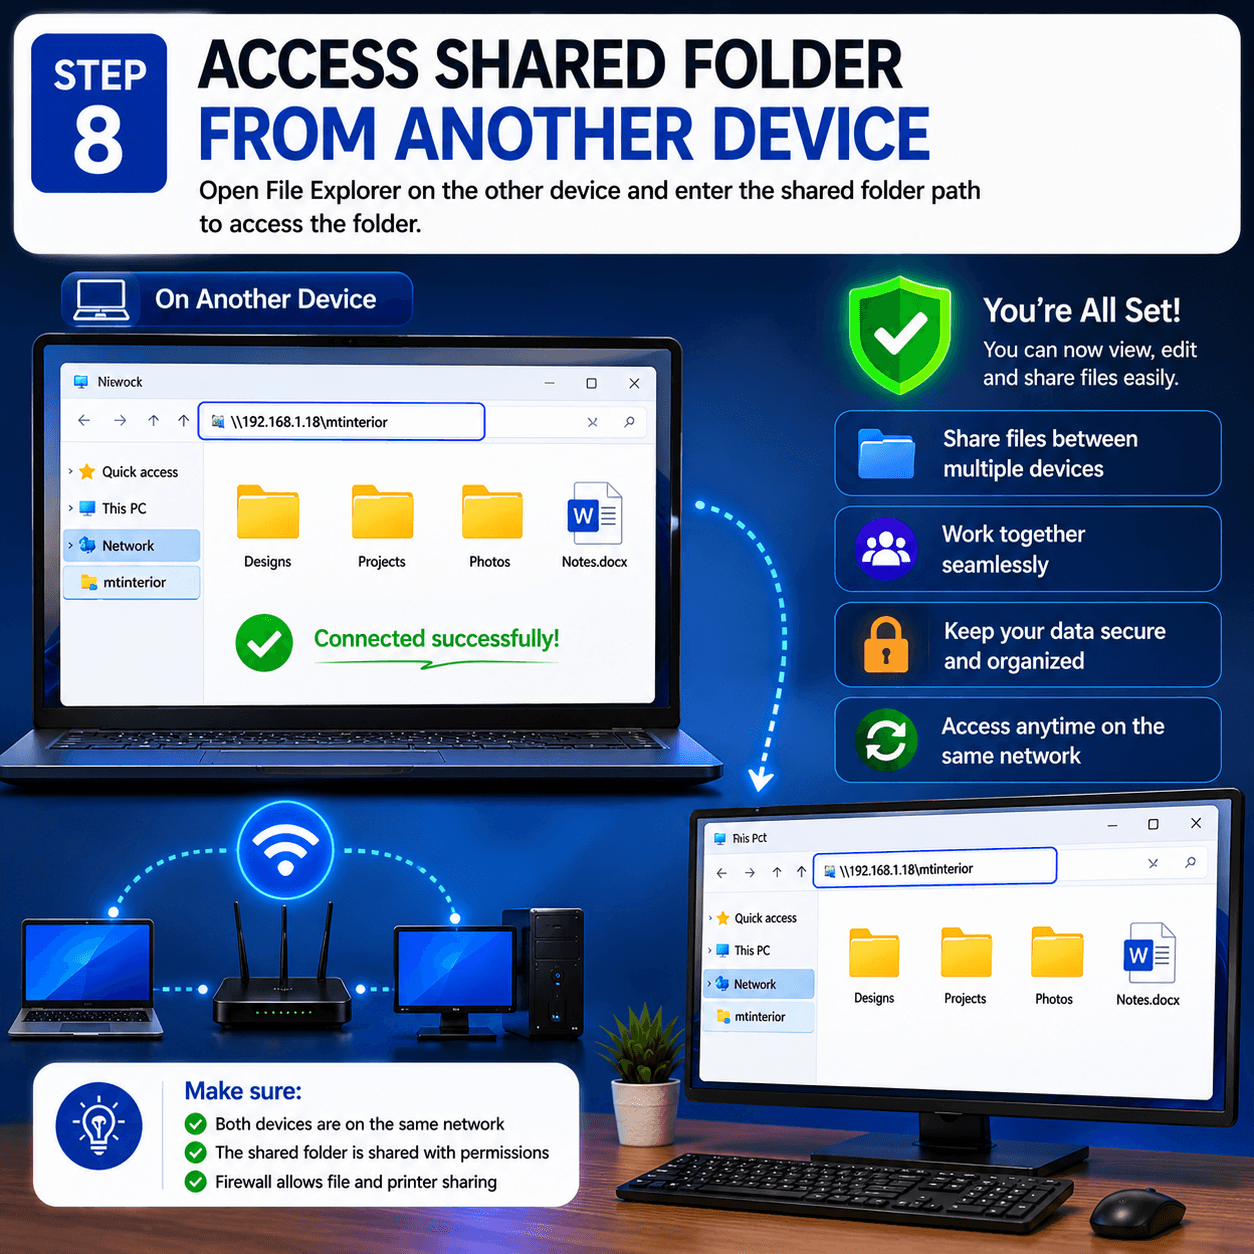
On the second PC or laptop, open File Explorer. In the address bar, type:
\\192.168.1.18\mtinterior
You can also use the computer name:
\\Desktop-vqbcc4r\mtinterior
If everything is set correctly, the shared folder will open.
Step 9: Enter Username and Password If Asked
Windows may ask for network credentials. Use the username of the computer where the folder is shared. Example:
desktop-vqbcc4r\user
Then enter the normal Windows account password of that computer.
Step 10: Remove Wrong Saved Credentials
If you entered the wrong password before, Windows may save it and keep showing errors. To fix this, open:
Control Panel → Credential Manager → Windows Credentials
Remove saved entries related to:
192.168.1.18
or the computer name. Then try accessing the shared folder again and enter the correct username and password.
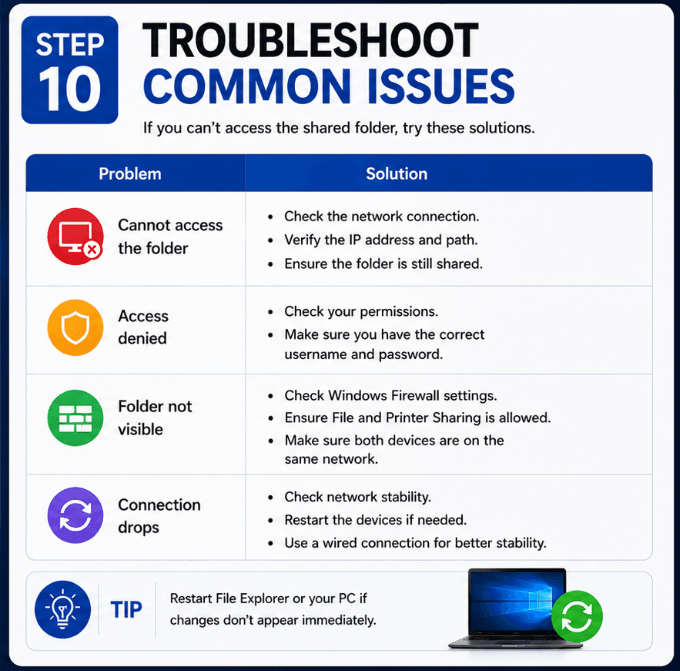
Common Problems and Quick Fixes
- If Windows asks for a password again and again, make sure you are using the actual Windows password, not the PIN.
- If you see a message saying guest access is blocked, it means Windows security policy is blocking password-free access. The safest solution is to use a Windows username and password.
- If the shared folder does not open, try using the IP address instead of the computer name.
- If the account gets locked, wait for some time or restart the sharing PC, then remove old saved credentials and try again.
- If you cannot access the full drive, create a folder inside the drive and share only that folder. This is usually more stable and safer.
Final Result
After completing these steps, you can easily transfer data between your PC and laptop over the same WiFi or Ethernet network. You can copy videos, project files, software backups, documents, design folders, and other data from one SSD or HDD to another without using a USB drive.
For the best speed, use Ethernet. WiFi also works, but the speed depends on your router, signal strength, and file size.
This is one of the easiest ways to move data between two Windows devices when both are connected to the same local network.